Badlands: Difference between revisions
Jump to navigation
Jump to search
m Blanked the page |
mNo edit summary |
||
| (81 intermediate revisions by 19 users not shown) | |||
| Line 1: | Line 1: | ||
{{Infobox map | |||
| title = Badlands | |||
| image= Badlands.jpg | |||
| also_known_as = Prolands | |||
| map_type = 5CP | |||
| latest_version = cp_badlands_rc2ta | |||
| first_released = February 14, 2008 | |||
| last_updated = July 2, 2019 | |||
| developer1 = [https://en.wikipedia.org/wiki/Valve_Corporation Valve] | |||
| official_map = No | |||
| download = https://dl.serveme.tf/maps/cp_prolands_rc2ta.bsp | |||
| format = [[6v6]] | |||
| in_rotation = [[OZF 34]] | |||
}} | |||
''' Badlands ''' is a [[5CP]] map created by [https://en.wikipedia.org/wiki/Valve_Corporation Valve]. It was one of the first maps added into the game and thus is one of the oldest widely-used [[6v6]] maps. | |||
== Callouts == | |||
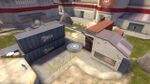
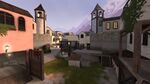
=== Mid point === | |||
{{Map locations | |||
| title = Badlands mid point callouts | |||
| image = Badlands.jpg | |||
| area1 = Train | |||
| x1 = 325px | |||
| y1 = 173px | |||
| area2 = Balcony | |||
| x2 = 204px | |||
| y2 = 294px | |||
| area3 = Shithouse | |||
| x3 = 680px | |||
| y3 = 286px | |||
| area4 = Lower | |||
| x4 = 416px | |||
| y4 = 277px | |||
| area5 = Hoodoo | |||
| x5 = 295px | |||
| y5 = 213px | |||
}} | |||
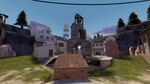
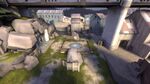
=== Second point === | |||
{{Map locations | |||
| title = Badlands second point callouts | |||
| image = Badlands Second.jpg | |||
| area1 = Choke | |||
| x1 = 183px | |||
| y1 = 110px | |||
| area2 = Haunter / Patio | |||
| x2 = 256px | |||
| y2 = 123px | |||
| area3 = Stone Bridge | |||
| x3 = 443px | |||
| y3 = 183px | |||
| area4 = Spire | |||
| x4 = 348px | |||
| y4 = 126px | |||
| area5 = Trash | |||
| x5 = 676px | |||
| y5 = 327px | |||
| area6 = Launchpad / Ramp / Pride | |||
| x6 = 173px | |||
| y6 = 171px | |||
| area7 = Balcony / Battlements | |||
| x7 = 533px | |||
| y7 = 183px | |||
}} | |||
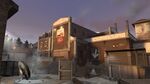
=== Lobby === | |||
{{Map locations | |||
| title = Badlands lobby callouts | |||
| image = Badlands Last Point 2.jpg | |||
| area1 = Balcony / Battlements | x1=100px | y1=30px | |||
| area2 = Lower / Lower Lobby | x2=293px | y2=52px | |||
| area3 = Top Lobby | x3=372px | y3=156px | |||
| area4 = Dropdown | x4=721px | y4=209px | |||
| area5 = Stairs | x5=515px | y5=391px | |||
}} | |||
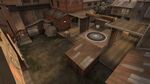
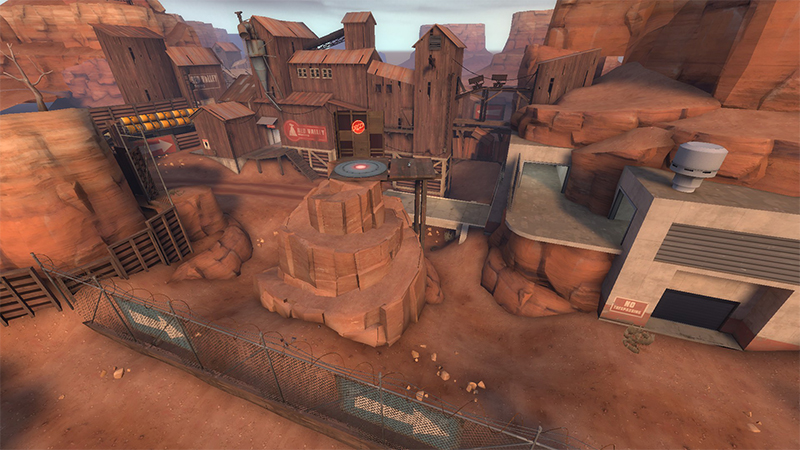
=== Last point === | |||
{{Map locations | |||
| title = Badlands last point callouts | |||
| image = Badlands Last Point.jpg | |||
| area1 = Left | x1=444px | y1=87px | |||
| area2 = Lower left | x2=395px | y2=135px | |||
| area3 = Point | x3=322px | y3=177px | |||
| area4 = Main | x4=577px | y4=201px | |||
| area5 = Upper Right | x5=755px | y5=335px | |||
| area6 = Spawn | x6=42px | y6=94px | |||
| area7 = Right | x7=136px | y7=183px | |||
| area8 = Lower Right | x8=16px | y8=254px | |||
| area9 = Chute | x9=322px | y9=100px | |||
}} | |||
== Rollouts == | |||
The most technical rollout for Badlands is for [[Demoman]], which will usually lead to the medium health back in house. | |||
{{#ev:youtube|Fh4YCUE4zoI|480}} | |||
== Map information == | |||
{{Box|start|padding=2em}} | |||
{| class="wikitable" width="450px" style="text-align:center" | |||
|+ Point capture times (seconds) | |||
! Multiplier | |||
! [[Glossary#Mid|Mid]] | |||
! [[Glossary#Second|Second]] | |||
! [[Glossary#Last|Last]] (<code style="font-weight:normal">p</code> version) | |||
! Last (<code style="font-weight:normal">t</code>,<code style="font-weight:normal">ta</code> version) | |||
|- | |||
! x1 | |||
| 24.00 | |||
| 12.00 | |||
| 4.00 | |||
| 2.00 | |||
|- | |||
! x2 | |||
| 16.00 | |||
| 8.00 | |||
| 2.67 | |||
| 1.33 | |||
|- | |||
! x3 | |||
| 13.09 | |||
| 6.55 | |||
| 2.18 | |||
| 1.09 | |||
|- | |||
! x4 | |||
| 11.52 | |||
| 5.76 | |||
| 1.92 | |||
| 0.96 | |||
|- | |||
! x5 | |||
| 10.51 | |||
| 5.26 | |||
| 1.75 | |||
| 0.88 | |||
|- | |||
! x6 | |||
| 9.80 | |||
| 4.90 | |||
| 1.63 | |||
| 0.82 | |||
|- | |||
! x7 | |||
| 9.26 | |||
| 4.63 | |||
| 1.54 | |||
| 0.77 | |||
|- | |||
! x8 | |||
| 8.83 | |||
| 4.42 | |||
| 1.47 | |||
| 0.74 | |||
|- | |||
! x9 | |||
| 8.48 | |||
| 4.24 | |||
| 1.41 | |||
| 0.71 | |||
|- | |||
! x10 | |||
| 8.19 | |||
| 4.10 | |||
| 1.37 | |||
| 0.68 | |||
|- | |||
! x11 | |||
| 7.95 | |||
| 3.97 | |||
| 1.32 | |||
| 0.66 | |||
|} | |||
{{Box|break|padding=2em}} | |||
{| class="wikitable" width="300px" style="text-align:center" | |||
|+ Respawn wave times (seconds) | |||
! colspan=5 | Control points owned by opposing team | |||
|- | |||
! 1 | |||
! 2 | |||
! Neutral | |||
! 3 | |||
! 4 | |||
|- | |||
| 11 | |||
| 10 | |||
| 10 | |||
| 10 | |||
| 10 | |||
|} | |||
{{Box|break}} | |||
{| class="wikitable" width="300px" style="text-align:center" | |||
|+ Health and ammo packs | |||
! [[File:Smallhealth.png|20px|Small health|link=]] | |||
! [[File:Mediumhealth.png|20px|Medium health|link=]] | |||
! [[File:Smallammo.png|20px|Small ammo|link=]] | |||
! [[File:Mediumammo.png|20px|Medium ammo|link=]] | |||
|- | |||
| 14 | |||
| 4 | |||
| 16 | |||
| 7 | |||
|} | |||
{{Box|end}} | |||
== Map pool history == | |||
{| class="wikitable emptycells-gray mw-collapsible" style="text-align:center" | |||
|+ style="white-space:nowrap" | Badlands [[map pool history]] | |||
|- | |||
! {{abbr|DL|Download link}} | |||
! Map version | |||
! style="width:120px" | Asia | |||
! style="width:120px" | Europe | |||
! style="width:120px" | North America | |||
! style="width:120px" | Oceania | |||
|- | |||
! {{download|https://dl.serveme.tf/maps/cp_prolands_rc2ta.bsp}} | |||
! style="text-align:left; font-weight:normal" | <code>cp_prolands_rc2ta</code> | |||
| | |||
| | |||
| {{LeagueIconSmall|rgl}} [[RGL Traditional Sixes Season 8|Season 8]] | |||
| | |||
|- | |||
! {{download|https://dl.serveme.tf/maps/cp_prolands_rc2t.bsp}} | |||
! style="text-align:left; font-weight:normal" | <code>cp_prolands_rc2t</code> | |||
| | |||
| {{LeagueIconSmall|etf2l}} [[ETF2L 6v6 Season 33|Season 33]] | |||
| | |||
| | |||
|- | |||
! rowspan=5 | {{download|https://dl.serveme.tf/maps/cp_prolands_rc2p.bsp}} | |||
! style="text-align:left; font-weight:normal" rowspan=5 | <code>cp_prolands_rc2p</code> | |||
| {{LeagueIconSmall|af}} [[AsiaFortress Cup 15|Cup 15]] | |||
| | |||
| | |||
| {{LeagueIconSmall|ozf}} [[OZF 34]] | |||
|- | |||
| | |||
| | |||
| | |||
| {{LeagueIconSmall|ozf}} [[OZF 28]] | |||
|- | |||
| | |||
| | |||
| | |||
| {{LeagueIconSmall|ozf}} [[OZF 26]] | |||
|- | |||
| | |||
| | |||
| | |||
| {{LeagueIconSmall|ozf}} [[OZF 25]] | |||
|- | |||
| | |||
| | |||
| | |||
| {{LeagueIconSmall|ozf}} [[OZF 24]] | |||
|- | |||
! {{download|https://dl.serveme.tf/maps/cp_prolands_b6.bsp}} | |||
! style="text-align:left; font-weight:normal" | <code>cp_prolands_b6</code> | |||
| | |||
| {{LeagueIconSmall|etf2l}} [[ETF2L 6v6 Season 31|Season 31]] | |||
| | |||
| {{LeagueIconSmall|ozf}} [[OZF 23]] | |||
|- | |||
! {{download|https://dl.serveme.tf/maps/cp_prolands_b5.bsp}} | |||
! style="text-align:left; font-weight:normal" | <code>cp_prolands_b5</code> | |||
| {{LeagueIconSmall|af}} [[AsiaFortress Cup 14|Cup 14]] | |||
| {{LeagueIconSmall|etf2l}} [[ETF2L 6v6 Season 30|Season 30]] | |||
| | |||
| | |||
|- | |||
! rowspan=3 | {{download|https://dl.serveme.tf/maps/cp_prolands_b4b.bsp}} | |||
! style="text-align:left; font-weight:normal" rowspan=3 | <code>cp_prolands_b4b</code> | |||
| | |||
| | |||
| | |||
| {{LeagueIconSmall|ozf}} [[OZF 22]] | |||
|- | |||
| | |||
| | |||
| | |||
| {{LeagueIconSmall|ozf}} [[OZF 21]] | |||
|- | |||
| | |||
| | |||
| | |||
| {{LeagueIconSmall|ozf}} [[OZF 20]] | |||
|- | |||
! {{download|https://dl.serveme.tf/maps/cp_prolands_b3b.bsp}} | |||
! style="text-align:left; font-weight:normal" | <code>cp_prolands_b3b</code> | |||
| {{LeagueIconSmall|af}} [[AsiaFortress Cup 13|Cup 13]] | |||
| {{LeagueIconSmall|etf2l}} [[ETF2L 6v6 Season 29|Season 29]] | |||
| | |||
| | |||
|- | |||
! {{download|https://dl.serveme.tf/maps/cp_prolands_b2c.bsp}} | |||
! style="text-align:left; font-weight:normal" | <code>cp_prolands_b2c</code> | |||
| | |||
| {{LeagueIconSmall|etf2l}} [[ETF2L 6v6 Season 28|Season 28]] | |||
| | |||
| | |||
|- | |||
! rowspan=29 | | |||
! style="text-align:left; font-weight:normal" rowspan=29 | <code>cp_badlands</code> | |||
| {{LeagueIconSmall|af}} [[AsiaFortress Cup 12|Cup 12]] | |||
| {{LeagueIconSmall|etf2l}} [[ETF2L 6v6 Season 27|Season 27]] | |||
| {{LeagueIconSmall|esea}} [[ESEA-I Season 31|Season 31]] | |||
| {{LeagueIconSmall|ozf}} [[OZF 19]] | |||
|- | |||
| {{LeagueIconSmall|af}} [[AsiaFortress Cup 11|Cup 11]] | |||
| {{LeagueIconSmall|etf2l}} [[ETF2L 6v6 Season 26|Season 26]] | |||
| {{LeagueIconSmall|esea}} [[ESEA-I Season 30|Season 30]] | |||
| {{LeagueIconSmall|ozf}} [[OZF 18]] | |||
|- | |||
| {{LeagueIconSmall|af}} [[AsiaFortress Cup 10|Cup 10]] | |||
| {{LeagueIconSmall|etf2l}} [[ETF2L 6v6 Season 25|Season 25]] | |||
| {{LeagueIconSmall|esea}} [[ESEA-I Season 29|Season 29]] | |||
| {{LeagueIconSmall|ozf}} [[OZF 17]] | |||
|- | |||
| {{LeagueIconSmall|af}} [[AsiaFortress Cup 9|Cup 9]] | |||
| {{LeagueIconSmall|etf2l}} [[ETF2L 6v6 Season 24|Season 24]] | |||
| {{LeagueIconSmall|esea}} [[ESEA-I Season 27|Season 27]] | |||
| {{LeagueIconSmall|ozf}} [[OZF 16]] | |||
|- | |||
| {{LeagueIconSmall|af}} [[AsiaFortress Cup 8|Cup 8]] | |||
| {{LeagueIconSmall|etf2l}} [[ETF2L 6v6 Season 23|Season 23]] | |||
| {{LeagueIconSmall|esea}} [[ESEA-I Season 26|Season 26]] | |||
| {{LeagueIconSmall|ozf}} [[OZF 15]] | |||
|- | |||
| {{LeagueIconSmall|af}} [[AsiaFortress Cup 7|Cup 7]] | |||
| {{LeagueIconSmall|etf2l}} [[ETF2L 6v6 Season 22|Season 22]] | |||
| {{LeagueIconSmall|esea}} [[ESEA-I Season 25|Season 25]] | |||
| {{LeagueIconSmall|ozf}} [[OWL 14]] | |||
|- | |||
| {{LeagueIconSmall|af}} [[AsiaFortress Cup 6|Cup 6]] | |||
| {{LeagueIconSmall|etf2l}} [[ETF2L 6v6 Season 21|Season 21]] | |||
| {{LeagueIconSmall|esea}} [[ESEA-I Season 24|Season 24]] | |||
| {{LeagueIconSmall|ozf}} [[OWL 13]] | |||
|- | |||
| {{LeagueIconSmall|af}} [[AsiaFortress Season 5|Season 5]] | |||
| {{LeagueIconSmall|etf2l}} [[ETF2L 6v6 Season 20|Season 20]] | |||
| {{LeagueIconSmall|esea}} [[ESEA-I Season 23|Season 23]] | |||
| {{LeagueIconSmall|ozf}} [[OWL 12]] | |||
|- | |||
| {{LeagueIconSmall|af}} [[AsiaFortress Season 4|Season 4]] | |||
| {{LeagueIconSmall|etf2l}} [[ETF2L 6v6 Season 19|Season 19]] | |||
| {{LeagueIconSmall|esea}} [[ESEA-I Season 22|Season 22]] | |||
| {{LeagueIconSmall|ozf}} [[OWL 11]] | |||
|- | |||
| {{LeagueIconSmall|af}} [[AsiaFortress Season 3|Season 3]] | |||
| {{LeagueIconSmall|etf2l}} [[ETF2L 6v6 Season 18|Season 18]] | |||
| {{LeagueIconSmall|esea}} [[ESEA-I Season 21|Season 21]] | |||
| {{LeagueIconSmall|ozf}} [[OWL 10]] | |||
|- | |||
| {{LeagueIconSmall|af}} [[AsiaFortress Season 2|Season 2]] | |||
| {{LeagueIconSmall|etf2l}} [[ETF2L 6v6 Season 17|Season 17]] | |||
| {{LeagueIconSmall|esea}} [[ESEA-I Season 20|Season 20]] | |||
| {{LeagueIconSmall|ozf}} [[OWL 9]] | |||
|- | |||
| {{LeagueIconSmall|af}} [[AsiaFortress Season 1|Season 1]] | |||
| {{LeagueIconSmall|etf2l}} [[ETF2L 6v6 Season 16|Season 16]] | |||
| {{LeagueIconSmall|esea}} [[ESEA-I Season 19|Season 19]] | |||
| {{LeagueIconSmall|ozf}} [[OWL 8]] | |||
|- | |||
| | |||
| {{LeagueIconSmall|etf2l}} [[ETF2L 6v6 Season 15|Season 15]] | |||
| {{LeagueIconSmall|esea}} [[ESEA-I Season 18|Season 18]] | |||
| {{LeagueIconSmall|ozf}} [[OWL 7]] | |||
|- | |||
| | |||
| {{LeagueIconSmall|etf2l}} [[ETF2L 6v6 Season 14|Season 14]] | |||
| {{LeagueIconSmall|esea}} [[ESEA-I Season 17|Season 17]] | |||
| {{LeagueIconSmall|ozf}} [[OWL 6]] | |||
|- | |||
| | |||
| {{LeagueIconSmall|etf2l}} [[ETF2L 6v6 Season 13|Season 13]] | |||
| {{LeagueIconSmall|esea}} [[ESEA-I Season 16|Season 16]] | |||
| {{LeagueIconSmall|ozf}} [[OWL 5]] | |||
|- | |||
| | |||
| {{LeagueIconSmall|etf2l}} [[ETF2L 6v6 Season 12|Season 12]] | |||
| {{LeagueIconSmall|esea}} [[ESEA-I Season 15|Season 15]] | |||
| {{LeagueIconSmall|ozf}} [[OWL 4]] | |||
|- | |||
| | |||
| {{LeagueIconSmall|etf2l}} [[ETF2L 6v6 Season 11|Season 11]] | |||
| {{LeagueIconSmall|esea}} [[ESEA-I Season 14|Season 14]] | |||
| {{LeagueIconSmall|ozf}} [[OWL 3]] | |||
|- | |||
| | |||
| {{LeagueIconSmall|etf2l}} [[ETF2L 6v6 Season 10|Season 10]] | |||
| {{LeagueIconSmall|esea}} [[ESEA-I Season 13|Season 13]] | |||
| {{LeagueIconSmall|ozf}} [[OWL 2]] | |||
|- | |||
| | |||
| {{LeagueIconSmall|etf2l}} [[ETF2L 6v6 Season 9|Season 9]] | |||
| {{LeagueIconSmall|esea}} [[ESEA-I Season 12|Season 12]] | |||
| {{LeagueIconSmall|ozf}} [[OWL 1]] | |||
|- | |||
| | |||
| {{LeagueIconSmall|etf2l}} [[ETF2L 6v6 Season 8|Season 8]] | |||
| {{LeagueIconSmall|esea}} [[ESEA-I Season 11|Season 11]] | |||
| | |||
|- | |||
| | |||
| {{LeagueIconSmall|etf2l}} [[ETF2L 6v6 Season 7|Season 7]] | |||
| {{LeagueIconSmall|esea}} [[ESEA-I Season 10|Season 10]] | |||
| | |||
|- | |||
| | |||
| {{LeagueIconSmall|etf2l}} [[ETF2L 6v6 Season 6|Season 6]] | |||
| {{LeagueIconSmall|esea}} [[ESEA-I Season 9|Season 9]] | |||
| | |||
|- | |||
| | |||
| {{LeagueIconSmall|etf2l}} [[ETF2L 6v6 Season 5|Season 5]] | |||
| {{LeagueIconSmall|esea}} [[ESEA-I Season 8|Season 8]] | |||
| | |||
|- | |||
| | |||
| {{LeagueIconSmall|etf2l}} [[ETF2L 6v6 Season 4|Season 4]] | |||
| {{LeagueIconSmall|esea}} [[ESEA-I Season 7|Season 7]] | |||
| | |||
|- | |||
| | |||
| {{LeagueIconSmall|etf2l}} [[ETF2L 6v6 Season 3|Season 3]] | |||
| {{LeagueIconSmall|esea}} [[ESEA-I Season 6|Season 6]] | |||
| | |||
|- | |||
| | |||
| {{LeagueIconSmall|etf2l}} [[ETF2L 6v6 Season 2|Season 2]] | |||
| {{LeagueIconSmall|esea}} [[ESEA-I Season 5|Season 5]] | |||
| | |||
|- | |||
| | |||
| | |||
| {{LeagueIconSmall|esea}} [[ESEA-I Season 4|Season 4]] | |||
| | |||
|- | |||
| | |||
| | |||
| {{LeagueIconSmall|esea}} [[ESEA-I Season 3|Season 3]] | |||
| | |||
|- | |||
| | |||
| | |||
| {{LeagueIconSmall|esea}} [[ESEA-O Season 2|Season 2]] | |||
| | |||
|} | |||
{{Navbox/6v6 maps}} | |||
Latest revision as of 11:10, 2 December 2022
| Badlands | |
|---|---|
 | |
| Map Information | |
| Also known as | Prolands |
| Map type | 5CP |
| Latest version | cp_badlands_rc2ta
|
| First released | February 14, 2008 |
| Last updated | July 2, 2019 |
| Developer | Valve |
| Official map | No |
| Download | |
| Competitive Information | |
| Format | 6v6 |
| In rotation | OZF 34 |
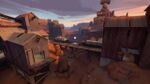
Badlands is a 5CP map created by Valve. It was one of the first maps added into the game and thus is one of the oldest widely-used 6v6 maps.
Callouts[edit | edit source]
Mid point[edit | edit source]
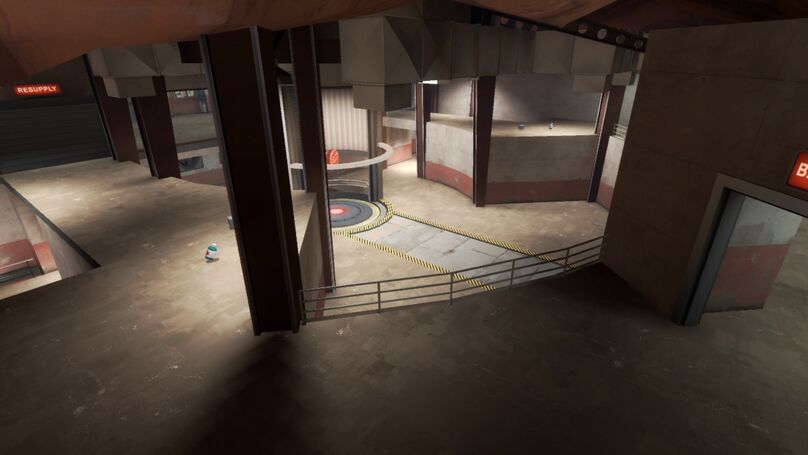
| Badlands mid point callouts |
|---|

Train Balcony Shithouse Lower Hoodoo |
Second point[edit | edit source]
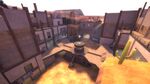
| Badlands second point callouts |
|---|
Choke Haunter / Patio Stone Bridge Spire Trash Launchpad / Ramp / Pride Balcony / Battlements |
Lobby[edit | edit source]
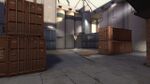
| Badlands lobby callouts |
|---|
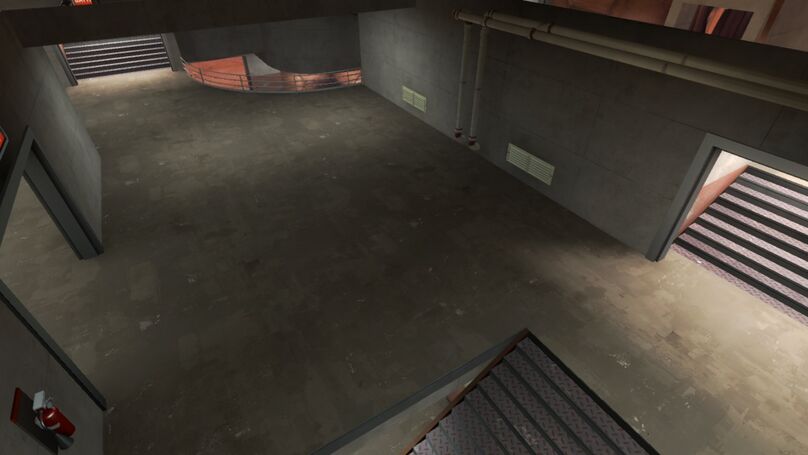
Balcony / Battlements Lower / Lower Lobby Top Lobby Dropdown Stairs |
Last point[edit | edit source]
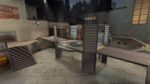
| Badlands last point callouts |
|---|
Left Lower left Point Main Upper Right Spawn Right Lower Right Chute |
Rollouts[edit | edit source]
The most technical rollout for Badlands is for Demoman, which will usually lead to the medium health back in house.
Map information[edit | edit source]
| Multiplier | Mid | Second | Last (p version)
|
Last (t,ta version)
|
|---|---|---|---|---|
| x1 | 24.00 | 12.00 | 4.00 | 2.00 |
| x2 | 16.00 | 8.00 | 2.67 | 1.33 |
| x3 | 13.09 | 6.55 | 2.18 | 1.09 |
| x4 | 11.52 | 5.76 | 1.92 | 0.96 |
| x5 | 10.51 | 5.26 | 1.75 | 0.88 |
| x6 | 9.80 | 4.90 | 1.63 | 0.82 |
| x7 | 9.26 | 4.63 | 1.54 | 0.77 |
| x8 | 8.83 | 4.42 | 1.47 | 0.74 |
| x9 | 8.48 | 4.24 | 1.41 | 0.71 |
| x10 | 8.19 | 4.10 | 1.37 | 0.68 |
| x11 | 7.95 | 3.97 | 1.32 | 0.66 |
| Control points owned by opposing team | ||||
|---|---|---|---|---|
| 1 | 2 | Neutral | 3 | 4 |
| 11 | 10 | 10 | 10 | 10 |
| 14 | 4 | 16 | 7 |
Map pool history[edit | edit source]
| 6v6 maps | |
| Currently in rotation | |
| 5CP | |
| KOTH | |
| Previously in rotation | |
| 5CP | Bazillion · Fastlane · Follower · Freight · Kalinka · Logjam · Mainline · Propaganda · Obscure · Reckoner · Sinshine · Warmfront · Waste (CP) · Well (CP) · Wildmire · Yukon |
| Attack/Defend | Dustbowl · Extraction · Gorge · Gravel Pit |
| Capture the Flag | 2Fort · Turbine · Well (CTF) |
| Domination | Standin |
| KOTH | Ashville · Coalplant |
| Payload | Gold Rush |