Snakewater: Difference between revisions
Jump to navigation
Jump to search
| (22 intermediate revisions by 2 users not shown) | |||
| Line 3: | Line 3: | ||
| image = Snakewater.jpg | | image = Snakewater.jpg | ||
| | | map_type = 5CP | ||
| latest_version = cp_snakewater_final1 | | latest_version = cp_snakewater_final1 | ||
| first_released = August 24, 2010 | | first_released = August 24, 2010 | ||
| last_updated = September 16, 2021 | | last_updated = September 16, 2021 | ||
| developer1 = [https://steamcommunity.com/profiles/76561198058513958 Toivo "chojje" Sawen] | | developer1 = [https://steamcommunity.com/profiles/76561198058513958 Toivo "chojje" Sawen] | ||
| official_map = Yes | |||
| | | format = [[6v6]] | ||
| | | in_rotation = [[AsiaFortress Cup 20]]<br />[[ETF2L 6v6 Season 42]]<br />[[RGL Traditional Sixes Season 10|RGL 6v6 Season 10]]<br />[[OZF 34]] | ||
}} | }} | ||
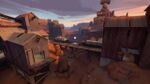
'''Snakewater''' is an official [[5CP]] map created by chojje, released on the second day of the [[Two Cities Update]] on November 21, 2013. | '''Snakewater''' is an official [[5CP]] map created by chojje, released on the second day of the [[Two Cities Update]] on November 21, 2013. | ||
== | == Callouts == | ||
=== Mid point === | |||
{{Map locations | |||
| title = Snakewater mid point callouts | |||
| image = cp_snakewater mid.png | |||
| area1 = Top right | x1=566px | y1=2px | |||
| area2 = Top left | x2=321px | y2=30px | |||
| area3 = Kitchen / Chicken | x3=293px | y3=94px | |||
| area4 = BLU top left | x4=231px | y4=121px | |||
| area5 = BLU top right | x5=688px | y5=122px | |||
| area6 = Hut / Shack / Shed | x6=534px | y6=181px | |||
| area7 = Catwalk / Planks | x7=138px | y7=196px | |||
| area8 = Slope / Yard | x8=311px | y8=285px | |||
| area9 = Main / Lower / Choke | x9=172px | y9=312px | |||
| area10 = Saw | x10=485px | y10=366px | |||
}} | |||
=== Second point === | |||
{{Map locations | |||
| title = Snakewater second point callouts | |||
| image = cp_snakewater second.png | |||
| area1 = Window / JFK | x1=504px | y1=3px | |||
| area2 = Main / Choke | x2=410px | y2=47px | |||
| area3 = Saw | x3=641px | y3=50px | |||
| area4 = Pipe | x4=609px | y4=61px | |||
| area5 = Yard / Green | x5=295px | y5=82px | |||
| area6 = Shack / Hut | x6=355px | y6=89px | |||
| area7 = Train | x7=466px | y7=130px | |||
| area8 = Africa / Lower / Pit | x8=462px | y8=217px | |||
| area9 = Fence | x9=250px | y9=222px | |||
| area10 = Ramp | x10=579px | y10=208px | |||
| area11 = Battlements / Balcony | x11=327px | y11=357px | |||
| area12 = Balcony | x12=197px | y12=400px | |||
}} | |||
=== Lobby === | |||
{{Map locations | |||
| title = Snakewater lobby callouts | |||
| image = cp_snakewater second2.png | |||
| area1 = Cheese / Rollout | x1=411px | y1=68px | |||
| area2 = Bucket | x2=484px | y2=68px | |||
| area3 = Lobby | x3=514px | y3=98px | |||
| area4 = Ramp to lower | x4=138px | y4=282px | |||
}} | |||
=== Last point === | |||
{{Map locations | |||
| title = Snakewater last point callouts | |||
| image = cp_snakewater last.png | |||
| area1 = Right | x1=513px | y1=37px | |||
| area2 = Hut / Cabin / Shed / Roof | x2=624px | y2=61px | |||
| area3 = Stairs | x3=439px | y3=101px | |||
| area4 = Lower | x4=309px | y4=141px | |||
| area5 = Left / Shutter| x5=197px | y5=163px | |||
| area6 = Dropdown | x6=50px | y6=159px | |||
| area7 = Crates | x7=297px | y7=290px | |||
| area8 = Right / Truck | x8=736px | y8=176px | |||
| area9 = Top | x9=511px | y9=305px | |||
}} | |||
== Map information == | |||
{{Box|start|padding=2em}} | |||
{| class="wikitable" width="300px" style="text-align:center" | |||
|+ Point capture times (seconds) | |||
! Multiplier | |||
! [[Glossary#Mid|Mid]] | |||
! [[Glossary#Second|Second]] | |||
! [[Glossary#Last|Last]] | |||
|- | |||
! x1 | |||
| 22.00 | |||
| 14.00 | |||
| 4.80 | |||
|- | |||
! x2 | |||
| 14.67 | |||
| 9.33 | |||
| 3.20 | |||
|- | |||
! x3 | |||
| 12.00 | |||
| 7.64 | |||
| 2.62 | |||
|- | |||
! x4 | |||
| 10.56 | |||
| 6.72 | |||
| 2.30 | |||
|- | |||
! x5 | |||
| 9.64 | |||
| 6.13 | |||
| 2.10 | |||
|- | |||
! x6 | |||
| 8.98 | |||
| 5.71 | |||
| 1.96 | |||
|- | |||
! x7 | |||
| 8.48 | |||
| 5.40 | |||
| 1.85 | |||
|- | |||
! x8 | |||
| 8.09 | |||
| 5.15 | |||
| 1.77 | |||
|- | |||
! x9 | |||
| 7.78 | |||
| 4.95 | |||
| 1.70 | |||
|- | |||
! x10 | |||
| 7.51 | |||
| 4.78 | |||
| 1.64 | |||
|- | |||
! x11 | |||
| 7.29 | |||
| 4.64 | |||
| 1.59 | |||
|} | |||
{{Box|break|padding=2em}} | |||
{| class="wikitable" width="300px" style="text-align:center" | |||
|+ Respawn wave times (seconds) | |||
! colspan=5 | Control points owned by opposing team | |||
|- | |||
! 1 | |||
! 2 | |||
! Neutral | |||
! 3 | |||
! 4 | |||
|- | |||
| 8 | |||
| 10 | |||
| 10 | |||
| 10 | |||
| 10 | |||
|} | |||
{{Box|break}} | |||
{| class="wikitable" width="300px" style="text-align:center" | |||
|+ Health and ammo packs | |||
! [[File:Smallhealth.png|20px|Small health|link=]] | |||
! [[File:Mediumhealth.png|20px|Medium health|link=]] | |||
! [[File:Smallammo.png|20px|Small ammo|link=]] | |||
! [[File:Mediumammo.png|20px|Medium ammo|link=]] | |||
|- | |||
| 12 | |||
| 6 | |||
| 8 | |||
| 12 | |||
|} | |||
{{Box|end}} | |||
== Map pool history == | |||
<!-- say something about how final1 actually has multiple versions, therefore explaining why it goes to _u13 and then back to final1 --> | <!-- say something about how final1 actually has multiple versions, therefore explaining why it goes to _u13 and then back to final1 --> | ||
{| class="wikitable emptycells-gray mw-collapsible" style="text-align:center" | {| class="wikitable emptycells-gray mw-collapsible" style="text-align:center" | ||
|+ Snakewater map pool history | |+ style="white-space:nowrap" | Snakewater [[map pool history]] | ||
|- | |- | ||
! {{abbr|DL|Download link}} | ! {{abbr|DL|Download link}} | ||
! Map version | ! Map version | ||
! style="width: | ! style="width:120px" | Asia | ||
! style="width: | ! style="width:120px" | Europe | ||
! style="width: | ! style="width:120px" | North America | ||
! style="width: | ! style="width:120px" | Oceania | ||
|- | |||
! rowspan=21 | | |||
! style="text-align:left; font-weight:normal" rowspan=21 | <code>cp_snakewater_final1</code> | |||
| | |||
| {{LeagueIconSmall|etf2l}} [[ETF2L 6v6 Season 46|Season 46]] | |||
| | |||
| | |||
|- | |||
| | |||
| {{LeagueIconSmall|etf2l}} [[ETF2L 6v6 Season 45|Season 45]] | |||
| | |||
| | |||
|- | |||
| | |||
| {{LeagueIconSmall|etf2l}} [[ETF2L 6v6 Season 44|Season 44]] | |||
| | |||
| | |||
|- | |||
| | |||
| {{LeagueIconSmall|etf2l}} [[ETF2L 6v6 Season 43|Season 43]] | |||
| | |||
| | |||
|- | |- | ||
| {{LeagueIconSmall|af}} [[AsiaFortress Cup 20|Cup 20]] | | {{LeagueIconSmall|af}} [[AsiaFortress Cup 20|Cup 20]] | ||
| {{LeagueIconSmall|etf2l}} [[ETF2L 6v6 Season 42|Season 42]] | | {{LeagueIconSmall|etf2l}} [[ETF2L 6v6 Season 42|Season 42]] | ||
| {{LeagueIconSmall|rgl}} [[RGL Traditional Sixes Season | | {{LeagueIconSmall|rgl}} [[RGL Traditional Sixes Season 10|Season 10]] | ||
| {{LeagueIconSmall|ozf}} [[OZF 34]] | | {{LeagueIconSmall|ozf}} [[OZF 34]] | ||
|- | |- | ||
| {{LeagueIconSmall|af}} [[AsiaFortress Cup 19|Cup 19]] | | {{LeagueIconSmall|af}} [[AsiaFortress Cup 19|Cup 19]] | ||
| {{LeagueIconSmall|etf2l}} [[ETF2L 6v6 Season 41|Season 41]] | | {{LeagueIconSmall|etf2l}} [[ETF2L 6v6 Season 41|Season 41]] | ||
| {{LeagueIconSmall|rgl}} [[RGL Traditional Sixes Season | | {{LeagueIconSmall|rgl}} [[RGL Traditional Sixes Season 9|Season 9]] | ||
| {{LeagueIconSmall|ozf}} [[OZF 33]] | | {{LeagueIconSmall|ozf}} [[OZF 33]] | ||
|- | |- | ||
| {{LeagueIconSmall|af}} [[AsiaFortress Cup 18|Cup 18]] | | {{LeagueIconSmall|af}} [[AsiaFortress Cup 18|Cup 18]] | ||
| {{LeagueIconSmall|etf2l}} [[ETF2L 6v6 Season 40|Season 40]] | | {{LeagueIconSmall|etf2l}} [[ETF2L 6v6 Season 40|Season 40]] | ||
| {{LeagueIconSmall|rgl}} [[RGL Traditional Sixes Season | | {{LeagueIconSmall|rgl}} [[RGL Traditional Sixes Season 8|Season 8]] | ||
| {{LeagueIconSmall|ozf}} [[OZF 32]] | | {{LeagueIconSmall|ozf}} [[OZF 32]] | ||
|- | |- | ||
| {{LeagueIconSmall|af}} [[AsiaFortress Cup 17|Cup 17]] | | {{LeagueIconSmall|af}} [[AsiaFortress Cup 17|Cup 17]] | ||
| {{LeagueIconSmall|etf2l}} [[ETF2L 6v6 Season 39|Season 39]] | | {{LeagueIconSmall|etf2l}} [[ETF2L 6v6 Season 39|Season 39]] | ||
| {{LeagueIconSmall|rgl}} [[RGL Traditional Sixes Season | | {{LeagueIconSmall|rgl}} [[RGL Traditional Sixes Season 7|Season 7]] | ||
| {{LeagueIconSmall|ozf}} [[OZF 31]] | | {{LeagueIconSmall|ozf}} [[OZF 31]] | ||
|- | |- | ||
| {{LeagueIconSmall|af}} [[AsiaFortress Cup 16|Cup 16]] | | {{LeagueIconSmall|af}} [[AsiaFortress Cup 16|Cup 16]] | ||
| {{LeagueIconSmall|etf2l}} [[ETF2L 6v6 Season 38|Season 38]] | | {{LeagueIconSmall|etf2l}} [[ETF2L 6v6 Season 38|Season 38]] | ||
| {{LeagueIconSmall|rgl}} [[RGL Traditional Sixes Season | | {{LeagueIconSmall|rgl}} [[RGL Traditional Sixes Season 6|Season 6]] | ||
| {{LeagueIconSmall|ozf}} [[OZF 30]] | | {{LeagueIconSmall|ozf}} [[OZF 30]] | ||
|- | |- | ||
| {{LeagueIconSmall|af}} [[AsiaFortress Cup 15|Cup 15]] | | {{LeagueIconSmall|af}} [[AsiaFortress Cup 15|Cup 15]] | ||
| {{LeagueIconSmall|etf2l}} [[ETF2L 6v6 Season 37|Season 37]] | | {{LeagueIconSmall|etf2l}} [[ETF2L 6v6 Season 37|Season 37]] | ||
| {{LeagueIconSmall|rgl}} [[RGL Traditional Sixes Season | | {{LeagueIconSmall|rgl}} [[RGL Traditional Sixes Season 5|Season 5]] | ||
| {{LeagueIconSmall|ozf}} [[OZF 29]] | | {{LeagueIconSmall|ozf}} [[OZF 29]] | ||
|- | |- | ||
| {{LeagueIconSmall|af}} [[AsiaFortress Cup 14|Cup 14]] | | {{LeagueIconSmall|af}} [[AsiaFortress Cup 14|Cup 14]] | ||
| {{LeagueIconSmall|etf2l}} [[ETF2L 6v6 Season 36|Season 36]] | | {{LeagueIconSmall|etf2l}} [[ETF2L 6v6 Season 36|Season 36]] | ||
| {{LeagueIconSmall|rgl}} [[RGL Traditional Sixes Season | | {{LeagueIconSmall|rgl}} [[RGL Traditional Sixes Season 4|Season 4]] | ||
| {{LeagueIconSmall|ozf}} [[OZF 28]] | | {{LeagueIconSmall|ozf}} [[OZF 28]] | ||
|- | |- | ||
| {{LeagueIconSmall|af}} [[AsiaFortress Cup 13|Cup 13]] | | {{LeagueIconSmall|af}} [[AsiaFortress Cup 13|Cup 13]] | ||
| {{LeagueIconSmall|etf2l}} [[ETF2L 6v6 Season 35|Season 35]] | | {{LeagueIconSmall|etf2l}} [[ETF2L 6v6 Season 35|Season 35]] | ||
| {{LeagueIconSmall|rgl}} [[RGL Traditional Sixes Season | | {{LeagueIconSmall|rgl}} [[RGL Traditional Sixes Season 3|Season 3]] | ||
| {{LeagueIconSmall|ozf}} [[OZF 27]] | | {{LeagueIconSmall|ozf}} [[OZF 27]] | ||
|- | |- | ||
| {{LeagueIconSmall|af}} [[AsiaFortress Cup 12|Cup 12]] | | {{LeagueIconSmall|af}} [[AsiaFortress Cup 12|Cup 12]] | ||
| {{LeagueIconSmall|etf2l}} [[ETF2L 6v6 Season 34|Season 34]] | | {{LeagueIconSmall|etf2l}} [[ETF2L 6v6 Season 34|Season 34]] | ||
| {{LeagueIconSmall|rgl}} [[RGL Traditional Sixes Season | | {{LeagueIconSmall|rgl}} [[RGL Traditional Sixes Season 2|Season 2]] | ||
| {{LeagueIconSmall|ozf}} [[OZF 26]] | | {{LeagueIconSmall|ozf}} [[OZF 26]] | ||
|- | |- | ||
| {{LeagueIconSmall|af}} [[AsiaFortress Cup 11|Cup 11]] | | {{LeagueIconSmall|af}} [[AsiaFortress Cup 11|Cup 11]] | ||
| {{LeagueIconSmall|etf2l}} [[ETF2L 6v6 Season 33|Season 33]] | | {{LeagueIconSmall|etf2l}} [[ETF2L 6v6 Season 33|Season 33]] | ||
| {{LeagueIconSmall| | | {{LeagueIconSmall|rgl}} [[RGL Traditional Sixes Season 1|Season 1]] | ||
| {{LeagueIconSmall|ozf}} [[OZF 25]] | | {{LeagueIconSmall|ozf}} [[OZF 25]] | ||
|- | |- | ||
| | | | ||
| {{LeagueIconSmall|etf2l}} [[ETF2L 6v6 Season 32|Season 32]] | | {{LeagueIconSmall|etf2l}} [[ETF2L 6v6 Season 32|Season 32]] | ||
| {{LeagueIconSmall|esea}} [[ESEA-I Season | | {{LeagueIconSmall|esea}} [[ESEA-I Season 31|Season 31]] | ||
| {{LeagueIconSmall|ozf}} [[OZF 24]] | | {{LeagueIconSmall|ozf}} [[OZF 24]] | ||
|- | |- | ||
| | | | ||
| {{LeagueIconSmall|etf2l}} [[ETF2L 6v6 Season 31|Season 31]] | | {{LeagueIconSmall|etf2l}} [[ETF2L 6v6 Season 31|Season 31]] | ||
| {{LeagueIconSmall|esea}} [[ESEA-I Season | | {{LeagueIconSmall|esea}} [[ESEA-I Season 30|Season 30]] | ||
| {{LeagueIconSmall|ozf}} [[OZF 23]] | | {{LeagueIconSmall|ozf}} [[OZF 23]] | ||
|- | |- | ||
| | | | ||
| {{LeagueIconSmall|etf2l}} [[ETF2L 6v6 Season 30|Season 30]] | | {{LeagueIconSmall|etf2l}} [[ETF2L 6v6 Season 30|Season 30]] | ||
| {{LeagueIconSmall|esea}} [[ESEA-I Season | | {{LeagueIconSmall|esea}} [[ESEA-I Season 29|Season 29]] | ||
| {{LeagueIconSmall|ozf}} [[OZF 22]] | | {{LeagueIconSmall|ozf}} [[OZF 22]] | ||
|- | |- | ||
| | | | ||
| {{LeagueIconSmall|etf2l}} [[ETF2L 6v6 Season 29|Season 29]] | | {{LeagueIconSmall|etf2l}} [[ETF2L 6v6 Season 29|Season 29]] | ||
| {{LeagueIconSmall|esea}} [[ESEA-I Season | | {{LeagueIconSmall|esea}} [[ESEA-I Season 28|Season 28]] | ||
| {{LeagueIconSmall|ozf}} [[OZF 21]] | | {{LeagueIconSmall|ozf}} [[OZF 21]] | ||
|- | |- | ||
| | | | ||
| {{LeagueIconSmall|etf2l}} [[ETF2L 6v6 Season 28|Season 28]] | | {{LeagueIconSmall|etf2l}} [[ETF2L 6v6 Season 28|Season 28]] | ||
| {{LeagueIconSmall|esea}} [[ESEA-I Season | | {{LeagueIconSmall|esea}} [[ESEA-I Season 27|Season 27]] | ||
| {{LeagueIconSmall|ozf}} [[OZF 20]] | | {{LeagueIconSmall|ozf}} [[OZF 20]] | ||
|- | |- | ||
| | | | ||
| {{LeagueIconSmall|etf2l}} [[ETF2L 6v6 Season 27|Season 27]] | | {{LeagueIconSmall|etf2l}} [[ETF2L 6v6 Season 27|Season 27]] | ||
| | |{{LeagueIconSmall|esea}} [[ESEA-I Season 26|Season 26]] | ||
| | | | ||
|- | |- | ||
| Line 195: | Line 372: | ||
| {{LeagueIconSmall|ozf}} [[OWL 11]] | | {{LeagueIconSmall|ozf}} [[OWL 11]] | ||
|- | |- | ||
! | ! [[File:Download icon.png|20px|link=https://rotabland.eu/maps/map.php?id=5691&type=0]] | ||
! style="text-align:left; font-weight:normal" | <code>cp_snakewater_g7</code> | ! style="text-align:left; font-weight:normal" | <code>cp_snakewater_g7</code> | ||
| | | | ||
| Line 202: | Line 379: | ||
| {{LeagueIconSmall|ozf}} [[OWL 10]] | | {{LeagueIconSmall|ozf}} [[OWL 10]] | ||
|- | |- | ||
! rowspan=6 | | ! rowspan=6 | {{download|https://dl.serveme.tf/maps/cp_snakewater.bsp}} | ||
! style="text-align:left; font-weight:normal" rowspan=6 | <code>cp_snakewater</code> | ! style="text-align:left; font-weight:normal" rowspan=6 | <code>cp_snakewater</code> | ||
| {{LeagueIconSmall|af}} [[AsiaFortress Cup 7|Cup 7]] | | {{LeagueIconSmall|af}} [[AsiaFortress Cup 7|Cup 7]] | ||
| Line 214: | Line 391: | ||
| {{LeagueIconSmall|ozf}} [[OWL 8]] | | {{LeagueIconSmall|ozf}} [[OWL 8]] | ||
|- | |- | ||
| {{LeagueIconSmall|af}} [[AsiaFortress | | {{LeagueIconSmall|af}} [[AsiaFortress Season 5|Season 5]] | ||
| {{LeagueIconSmall|etf2l}} [[ETF2L 6v6 Season 13|Season 13]] | | {{LeagueIconSmall|etf2l}} [[ETF2L 6v6 Season 13|Season 13]] | ||
| {{LeagueIconSmall|esea}} [[ESEA-I Season 12|Season 12]] | | {{LeagueIconSmall|esea}} [[ESEA-I Season 12|Season 12]] | ||
| Line 234: | Line 411: | ||
| | | | ||
|- | |- | ||
! | ! [[File:Download icon.png|20px|link=https://rotabland.eu/maps/map.php?id=172&type=0]] | ||
! style="text-align:left; font-weight:normal" | <code>cp_snakewater_rc3</code> | ! style="text-align:left; font-weight:normal" | <code>cp_snakewater_rc3</code> | ||
| | | | ||
| Line 241: | Line 418: | ||
| | | | ||
|- | |- | ||
! | ! [[File:Download icon.png|20px|link=https://rotabland.eu/maps/map.php?id=932&type=0]] | ||
! style="text-align:left; font-weight:normal" | <code>cp_snakewater_b9</code> | ! style="text-align:left; font-weight:normal" | <code>cp_snakewater_b9</code> | ||
| | | | ||
| Line 249: | Line 426: | ||
|- | |- | ||
|} | |} | ||
{{Navbox/6v6 maps}} | {{Navbox/6v6 maps}} | ||
Latest revision as of 00:14, 13 February 2024
| Snakewater | |
|---|---|
 | |
| Map Information | |
| Map type | 5CP |
| Latest version | cp_snakewater_final1
|
| First released | August 24, 2010 |
| Last updated | September 16, 2021 |
| Developer | Toivo "chojje" Sawen |
| Official map | Yes |
| Competitive Information | |
| Format | 6v6 |
| In rotation | AsiaFortress Cup 20 ETF2L 6v6 Season 42 RGL 6v6 Season 10 OZF 34 |
Snakewater is an official 5CP map created by chojje, released on the second day of the Two Cities Update on November 21, 2013.
Callouts[edit | edit source]
Mid point[edit | edit source]
| Snakewater mid point callouts |
|---|
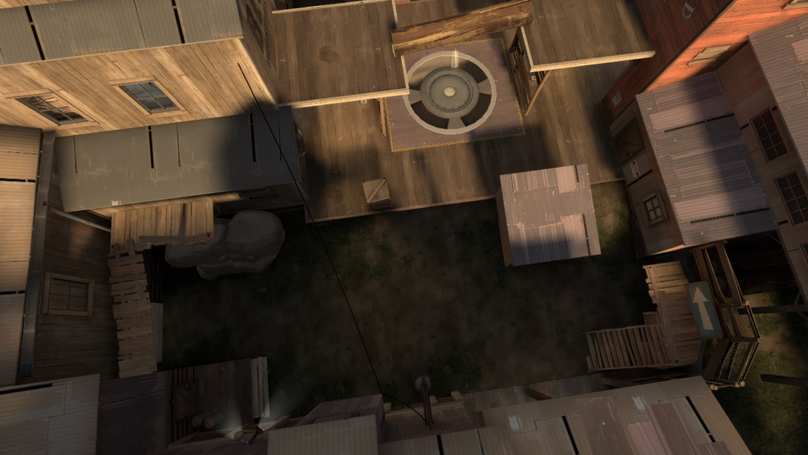
Top right Top left Kitchen / Chicken BLU top left BLU top right Hut / Shack / Shed Catwalk / Planks Slope / Yard Main / Lower / Choke Saw |
Second point[edit | edit source]
| Snakewater second point callouts |
|---|
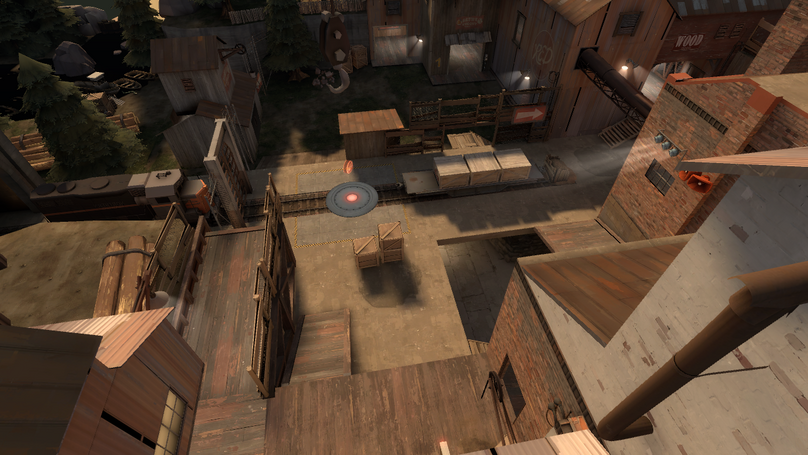
Window / JFK Main / Choke Saw Pipe Yard / Green Shack / Hut Train Africa / Lower / Pit Fence Ramp Battlements / Balcony Balcony |
Lobby[edit | edit source]
| Snakewater lobby callouts |
|---|
Cheese / Rollout Bucket Lobby Ramp to lower |
Last point[edit | edit source]
| Snakewater last point callouts |
|---|
Right Hut / Cabin / Shed / Roof Stairs Lower Left / Shutter Dropdown Crates Right / Truck Top |
Map information[edit | edit source]
| Multiplier | Mid | Second | Last |
|---|---|---|---|
| x1 | 22.00 | 14.00 | 4.80 |
| x2 | 14.67 | 9.33 | 3.20 |
| x3 | 12.00 | 7.64 | 2.62 |
| x4 | 10.56 | 6.72 | 2.30 |
| x5 | 9.64 | 6.13 | 2.10 |
| x6 | 8.98 | 5.71 | 1.96 |
| x7 | 8.48 | 5.40 | 1.85 |
| x8 | 8.09 | 5.15 | 1.77 |
| x9 | 7.78 | 4.95 | 1.70 |
| x10 | 7.51 | 4.78 | 1.64 |
| x11 | 7.29 | 4.64 | 1.59 |
| Control points owned by opposing team | ||||
|---|---|---|---|---|
| 1 | 2 | Neutral | 3 | 4 |
| 8 | 10 | 10 | 10 | 10 |
| 12 | 6 | 8 | 12 |
Map pool history[edit | edit source]
| 6v6 maps | |
| Currently in rotation | |
| 5CP | |
| KOTH | |
| Previously in rotation | |
| 5CP | Bazillion · Fastlane · Follower · Freight · Kalinka · Logjam · Mainline · Propaganda · Obscure · Reckoner · Sinshine · Warmfront · Waste (CP) · Well (CP) · Wildmire · Yukon |
| Attack/Defend | Dustbowl · Extraction · Gorge · Gravel Pit |
| Capture the Flag | 2Fort · Turbine · Well (CTF) |
| Domination | Standin |
| KOTH | Ashville · Coalplant |
| Payload | Gold Rush |